Requirements
- CentOS 7 / RHEL 7 / Ubuntu 16.04
- 8 GB RAM
- 5 GB Free Space on /opt/Zimbra
- 10 GB free disk space on /opt and /tmp
- Fully Qualified Domain Name (FQDN), in my case it is “mail.itzgeek.local”
- A & MX record for your Server
- The firewall should be disabled
Prerequisites
Become the root user.sudo su -OR
su -Install below packages
### CentOS 7 / RHEL 7 ###
yum install -y bind-utils net-tools wget curl perl

### Ubuntu 16.04 ###

apt-get install -y curl perl wget
Set the hostname of your mail server.hostnamectl set-hostname mail.itzgeek.localAdd the following lines in the
/etc/hosts file.192.168.1.25 mail.itzgeek.local mail
Firewall
Zimbra recommends the firewall to be disabled.### CentOS 7 / RHEL 7 ### systemctl stop firewalld systemctl disable firewalld ### Ubuntu 16.04 ### ufw disable
Disable Services
CentOS 7 / RHEL 7
In CentOS 7, postfix is installed and running by default. So, we need to disable it for Zimbra installation.systemctl stop postfix
systemctl disable postfix
Ubuntu 16.04
In Ubuntu 16.04, dnsmasq uses port 53 and acts as local resolver which conflicts with Zimbra DNS. So, we need to disable the use of dnsmasq.Edit NetworkManager.conf file.
nano /etc/NetworkManager/NetworkManager.conf
Comment out the dns=dnsmasq line by putting a hash # in front of it.#dns=dnsmasq
Then, restart the service.
service network-manager restart
Mail Server Setup
For this demo, I will configure Zimbra to receive emails for domainitzgeek.local.itzgeek.local is not a live internet domain, and it can’t receive or send emails to internet domains such as gmail.com or yahoo.com. So, I have created one more email server (
blog.local) in my environment to test the functionality.
Installation for the live domain is similar to local domain setup, and it will work only if the A, MX and SPF records are created properly as shown in the next step.
Create A and Mx Record
You would need to create A and MX record for your domain to receive emails.
Local Test Domain
The local test domain set up is done by creating A and MX record on the local DNS server.READ: How To Configure DNS Server on CentOS 7 / RHEL 7
READ: How To Configure DNS Server On Ubuntu 16.04
Verify A and MX Records
Verify that the A is configured for your domain usingdig command.dig -t A mail.itzgeek.local
Output:; <<>> DiG 9.9.4-RedHat-9.9.4-72.el7 <<>> mail.itzgeek.local
;; global options: +cmd
;; Got answer:
;; ->>HEADER<<- opcode: QUERY, status: NOERROR, id: 49222
;; flags: qr aa rd ra; QUERY: 1, ANSWER: 1, AUTHORITY: 0, ADDITIONAL: 1
;; OPT PSEUDOSECTION:
; EDNS: version: 0, flags:; udp: 4000
;; QUESTION SECTION:
;mail.itzgeek.local. IN A
;; ANSWER SECTION:
mail.itzgeek.local. 3600 IN A 192.168.1.25
;; Query time: 0 msec
;; SERVER: 192.168.1.230#53(192.168.1.230)
;; WHEN: Thu Dec 06 09:53:22 IST 2018
;; MSG SIZE rcvd: 63
Verify MX records.dig -t MX itzgeek.local
Output:; <<>> DiG 9.9.4-RedHat-9.9.4-72.el7 <<>> -t MX itzgeek.local
;; global options: +cmd
;; Got answer:
;; ->>HEADER<<- opcode: QUERY, status: NOERROR, id: 621
;; flags: qr aa rd ra; QUERY: 1, ANSWER: 1, AUTHORITY: 0, ADDITIONAL: 2
;; OPT PSEUDOSECTION:
; EDNS: version: 0, flags:; udp: 4000
;; QUESTION SECTION:
;itzgeek.local. IN MX
;; ANSWER SECTION:
itzgeek.local. 3600 IN MX 10 mail.itzgeek.local.
;; ADDITIONAL SECTION:
mail.itzgeek.local. 3600 IN A 192.168.1.25
;; Query time: 0 msec
;; SERVER: 192.168.1.230#53(192.168.1.230)
;; WHEN: Thu Dec 06 09:54:02 IST 2018
;; MSG SIZE rcvd: 79
Live Domain
A record is to point your system’s FQDN (hostname) to your mail server IPv4 address.NAME TTL TYPE DATA
mail.itzgeek.com. 3600 A 35.193.38.113
MX record is to specify which mail server is responsible for accepting email messages on behalf of your domain.NAME TYPE PRIORITY DATA
itzgeek.com. MX 10 mail.itzgeek.com.
SPF record is used to verify which mail servers are permitted to send
email on behalf of your domain. In the example below, emails sent from
all servers defined in MX record of itzgeek.com are permitted.itzgeek.com. 3600 IN TXT "v=spf1 mx mx:itzgeek.com ~all"
PTR (Pointer) is an IP address to domain name mapping, and it’s the
exact opposite of A record which maps domain names to IP addresses.Most of the organizations have spam filters which will perform a reverse DNS lookup on the IP address of your email server that is sending emails to them and would block emails from your server if the PTR record is not set. You would most likely need to reach to your hosting provider / ISP and make a request to create a reverse PTR record for your mail server IP address
If you are struggling to create DNS records, you can always reach your domain registrar for assistance.
Download Zimbra Collaboration 8.8 – Open Source Edition
Create a directory calledzimbra to place the installer.mkdir /zimbra
cd /zimbra
Download the Zimbra Collaboration Suite 8.8 – Open Source Edition from the official site or download using the wget command### CentOS 7 / RHEL 7 ### wget https://files.zimbra.com/downloads/8.8.10_GA/zcs-8.8.10_GA_3039.RHEL7_64.20180928094617.tgz ### Ubuntu 16.04 ### wget https://files.zimbra.com/downloads/8.8.10_GA/zcs-8.8.10_GA_3039.UBUNTU16_64.20180928094617.tgz
Install Zimbra Collaboration 8.8 – Open Source Edition
Extract the downloaded Zimbra archive file using thetar command### CentOS 7 / RHEL 7 ### tar -zxvf zcs-8.8.10_GA_3039.RHEL7_64.20180928094617.tgz ### Ubuntu 16.04 ### tar -zxvf zcs-8.8.10_GA_3039.UBUNTU16_64.20180928094617.tgzGo to the extracted folder.
### CentOS 7 / RHEL 7 ###
cd zcs-8.8.10_GA_3039.RHEL7_64.20180928094617

### Ubuntu 16.04 ###

cd zcs-8.8.10_GA_3039.UBUNTU16_64.20180928094617/
Execute the install script.
./install.sh
Once you execute the install script, you will get text-based installation wizard. Press Y to accept the Zimbra license agreement.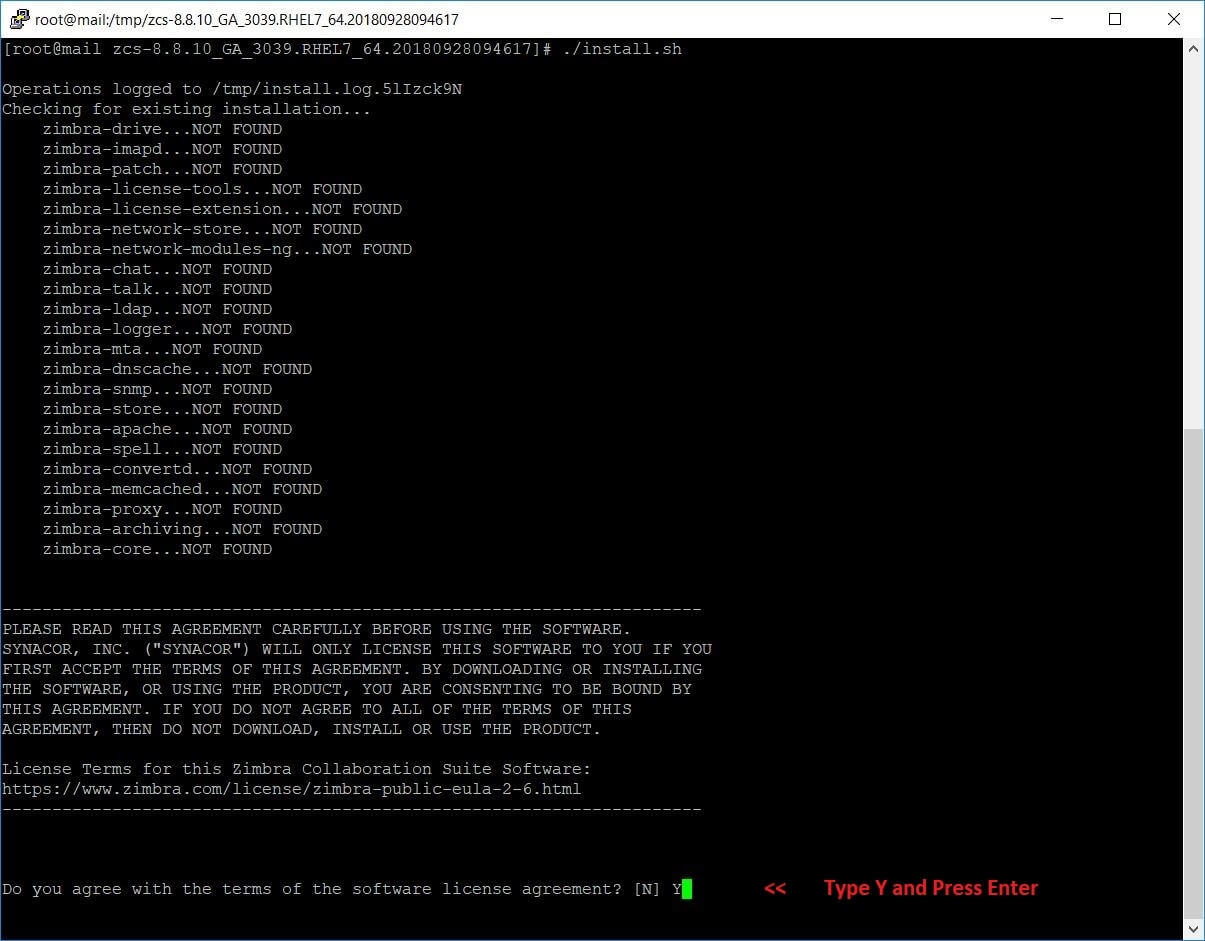
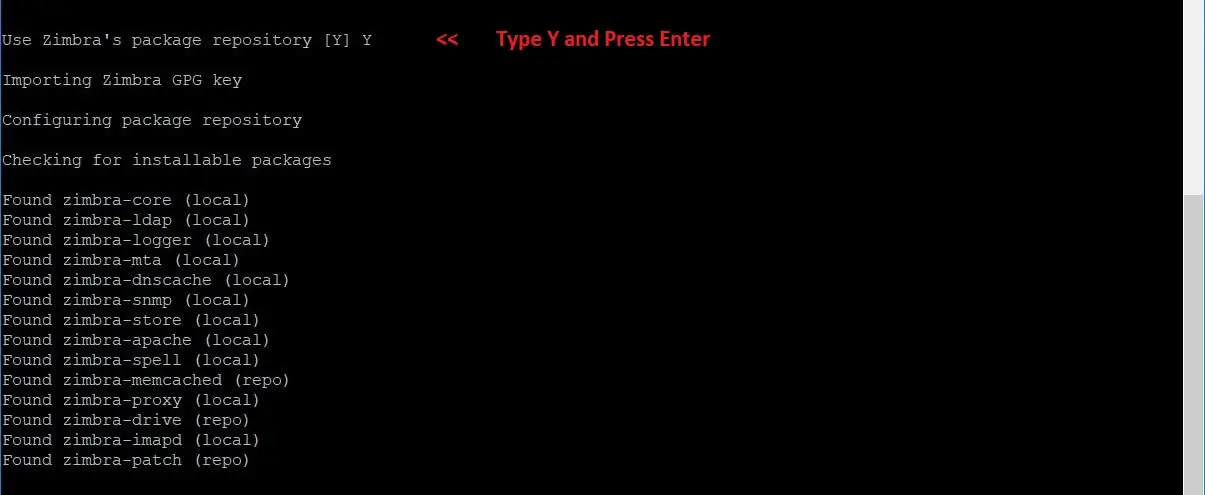
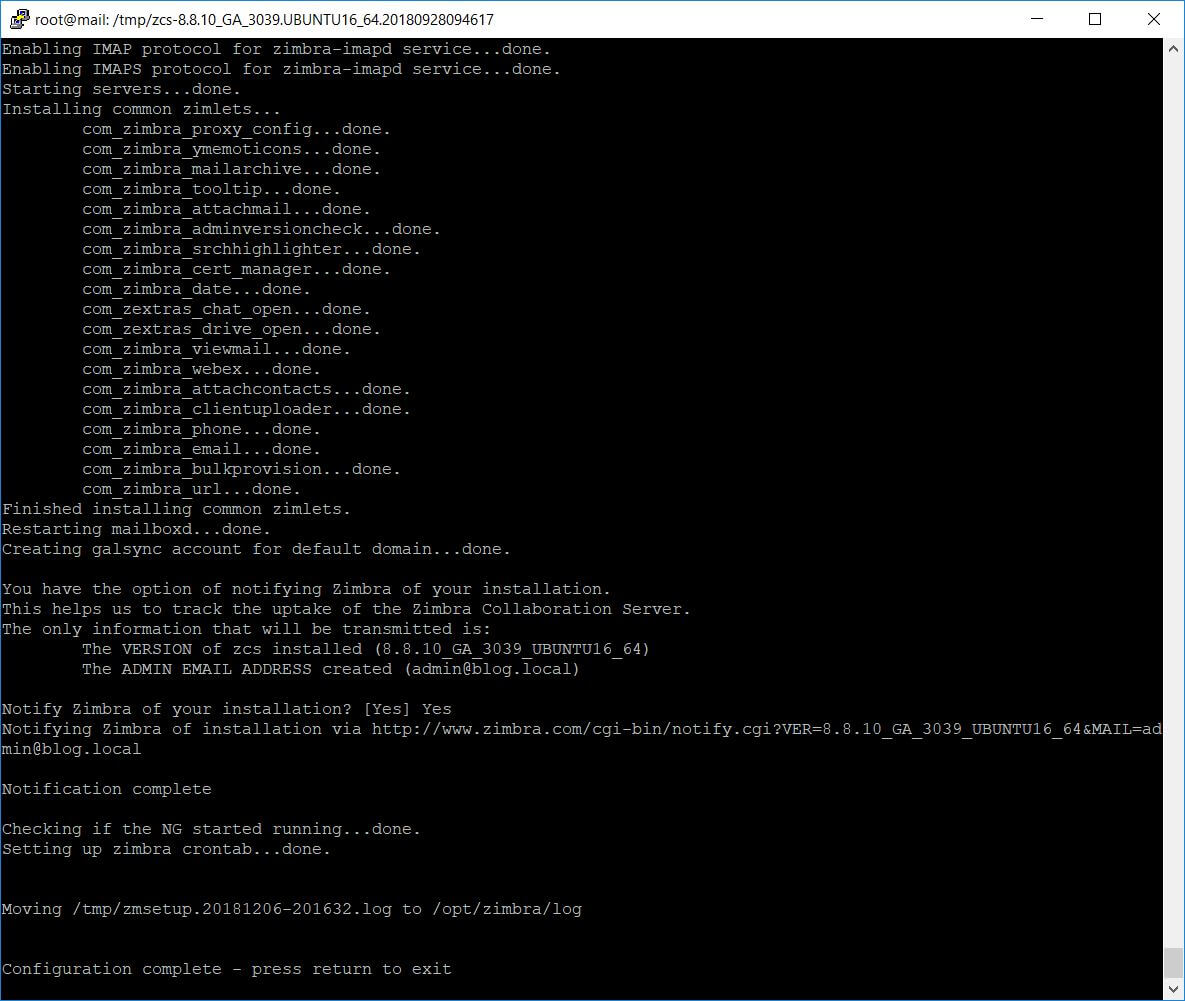
Y to all Zimbra Components to install.Also, press Y to continue to download the Zimbra related packages. This task can take time depending upon on your internet speed.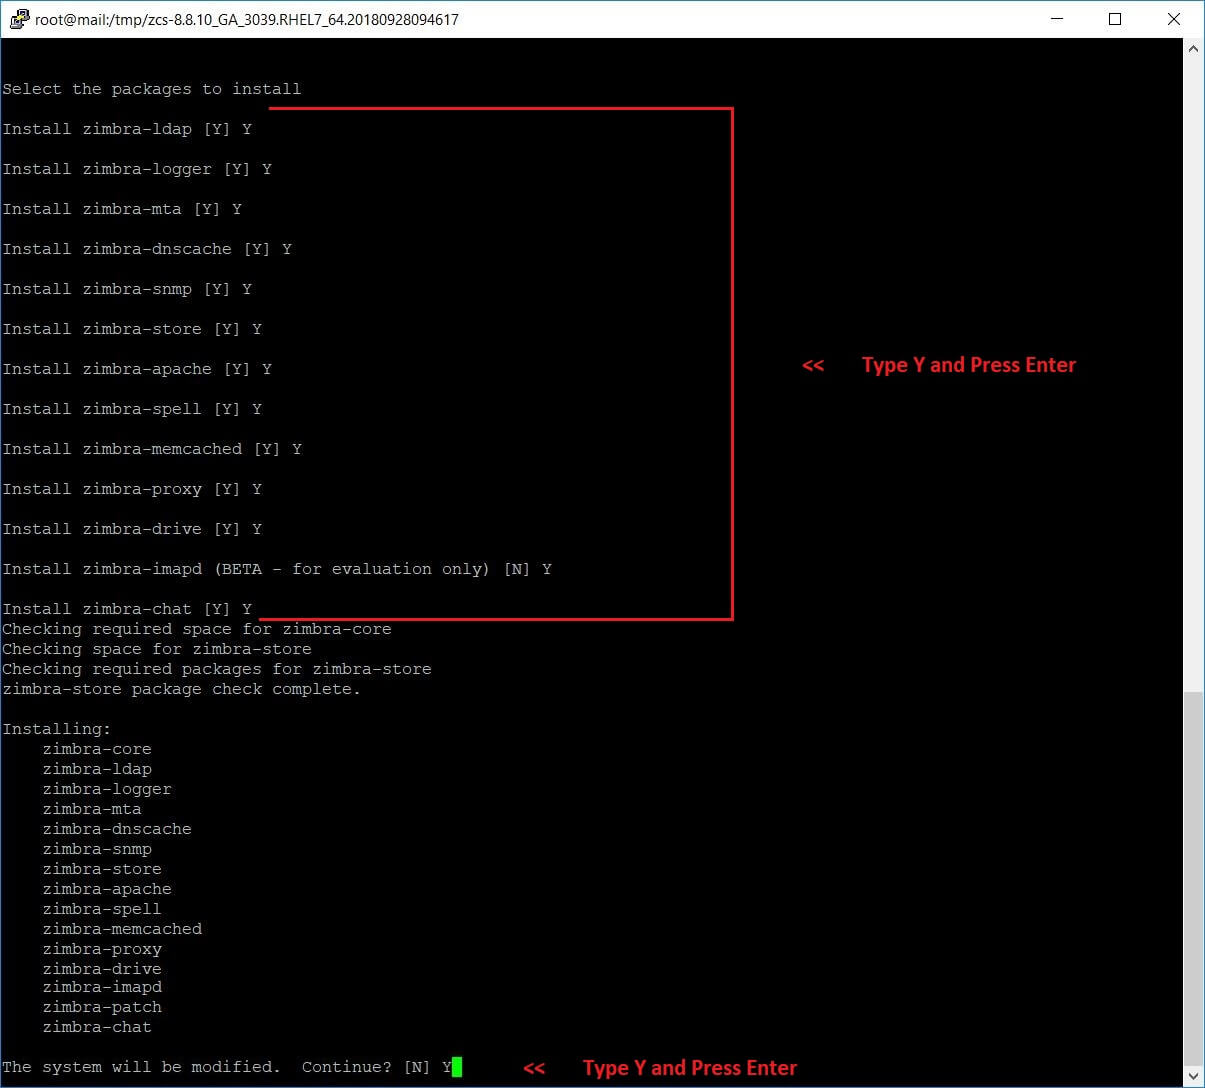
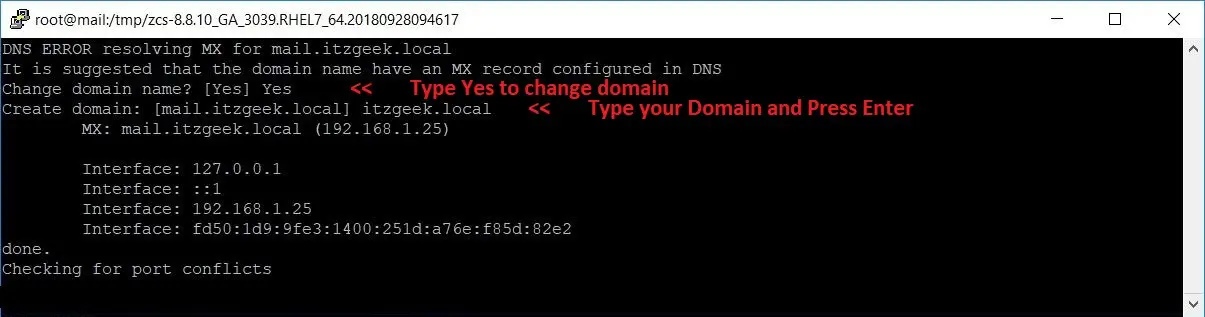
In my case, it is
itzgeek.local.
If your installation is for the live domain, enter like domain.com or domain.org.
7.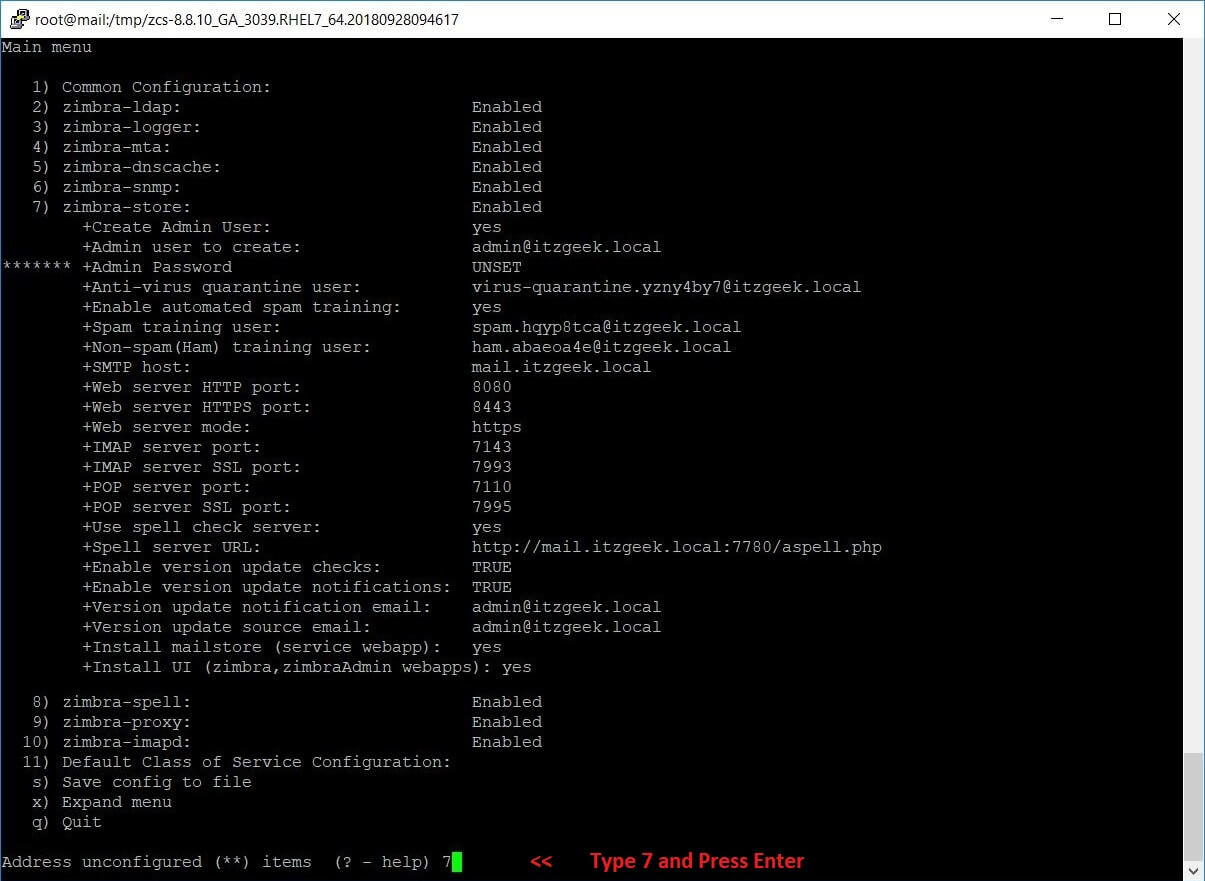
4 to set the Zimbra admin password.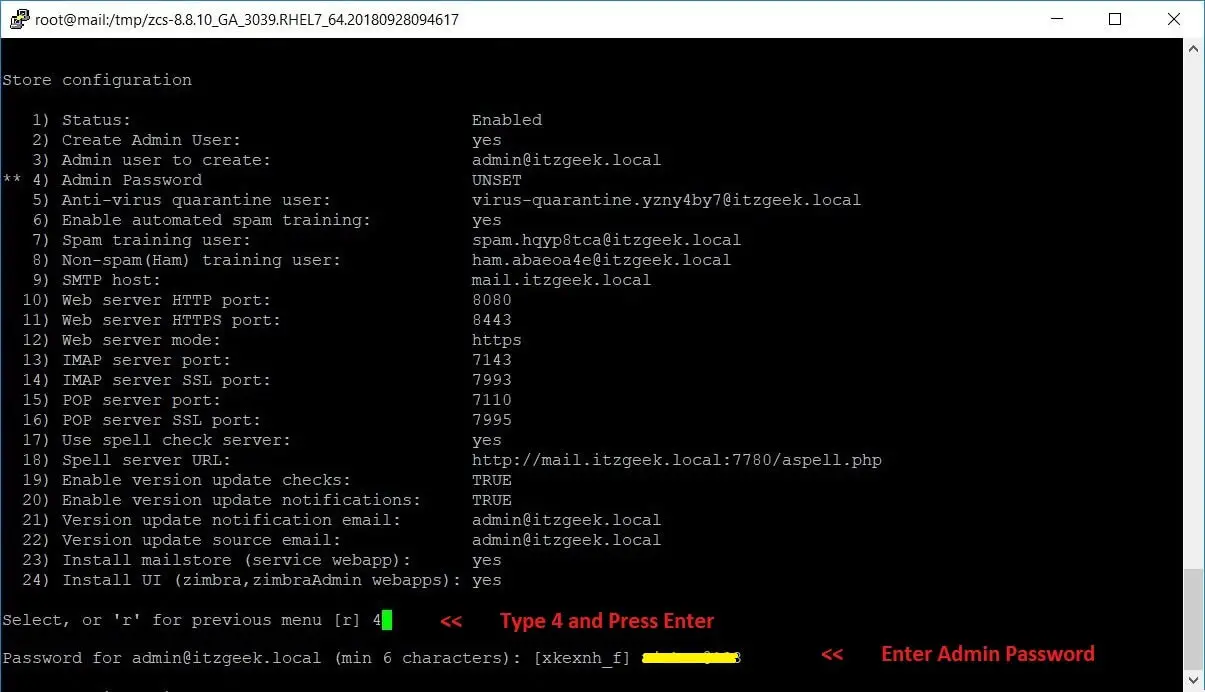
r to go to the previous menu and then press a to apply the changes.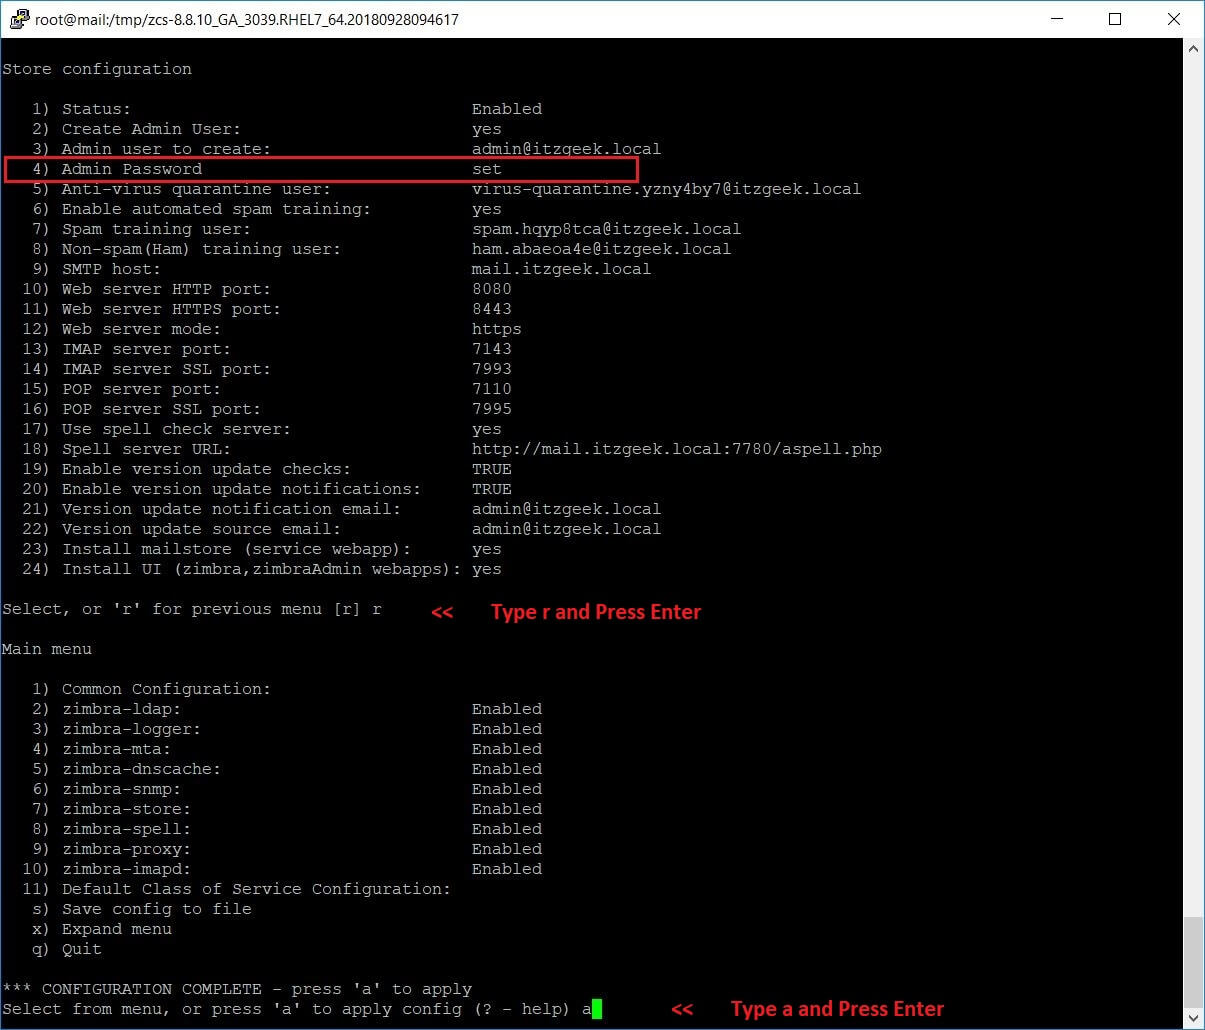

Verify Zimbra Services
To check the Zimbra services status from the command line, you would need to switch to zimbra user.[root@mail ~]# su - zimbra
[zimbra@mail ~]$ zmcontrol status
Output: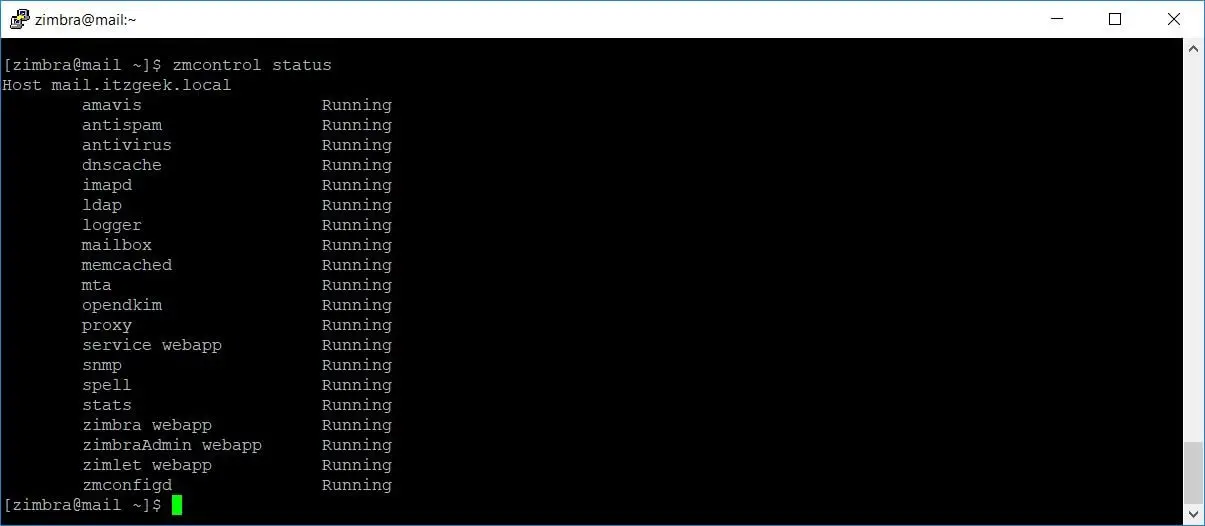
[zimbra@mail ~]$ zmcontrol restart
Output: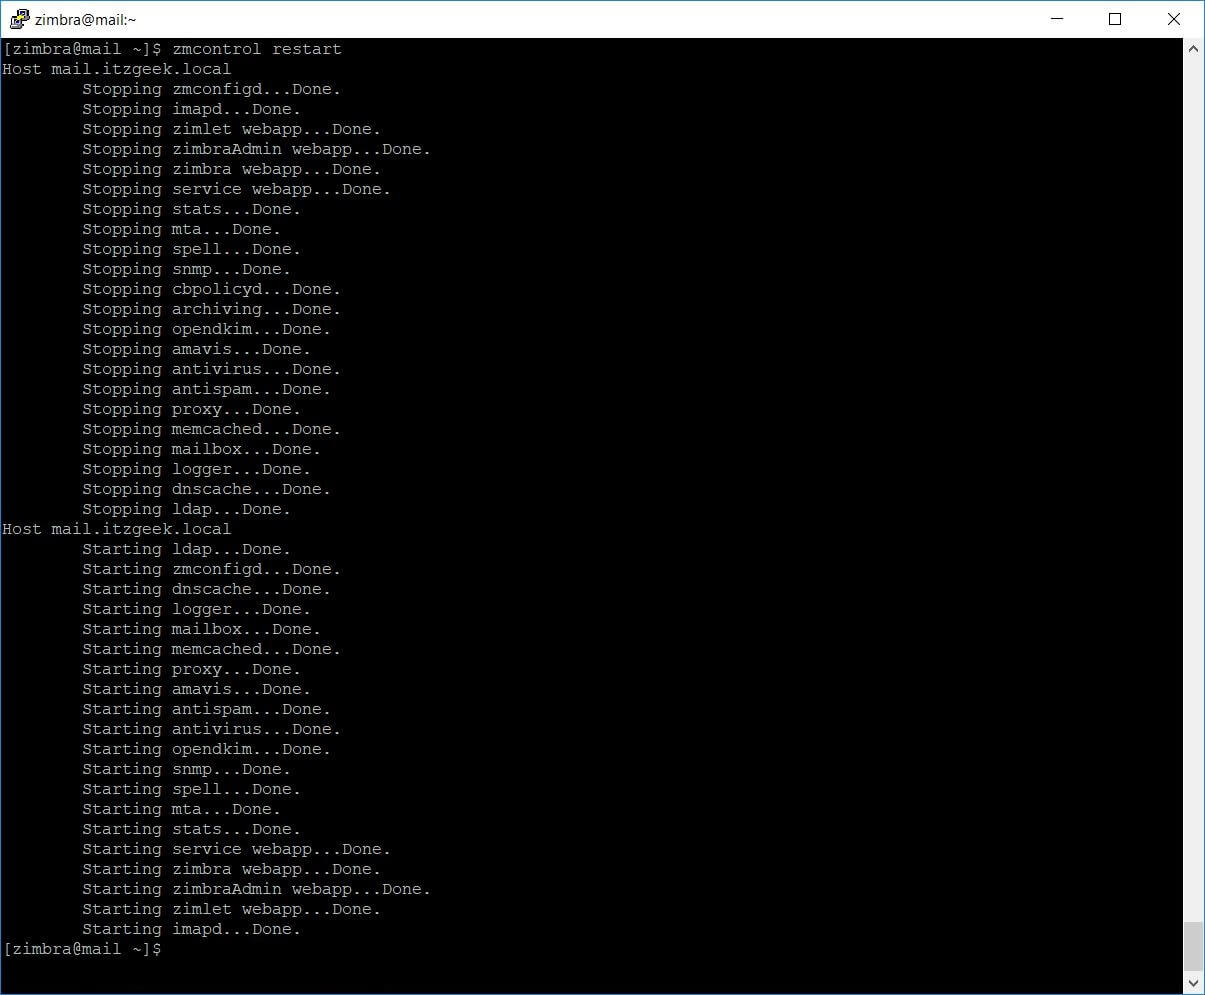
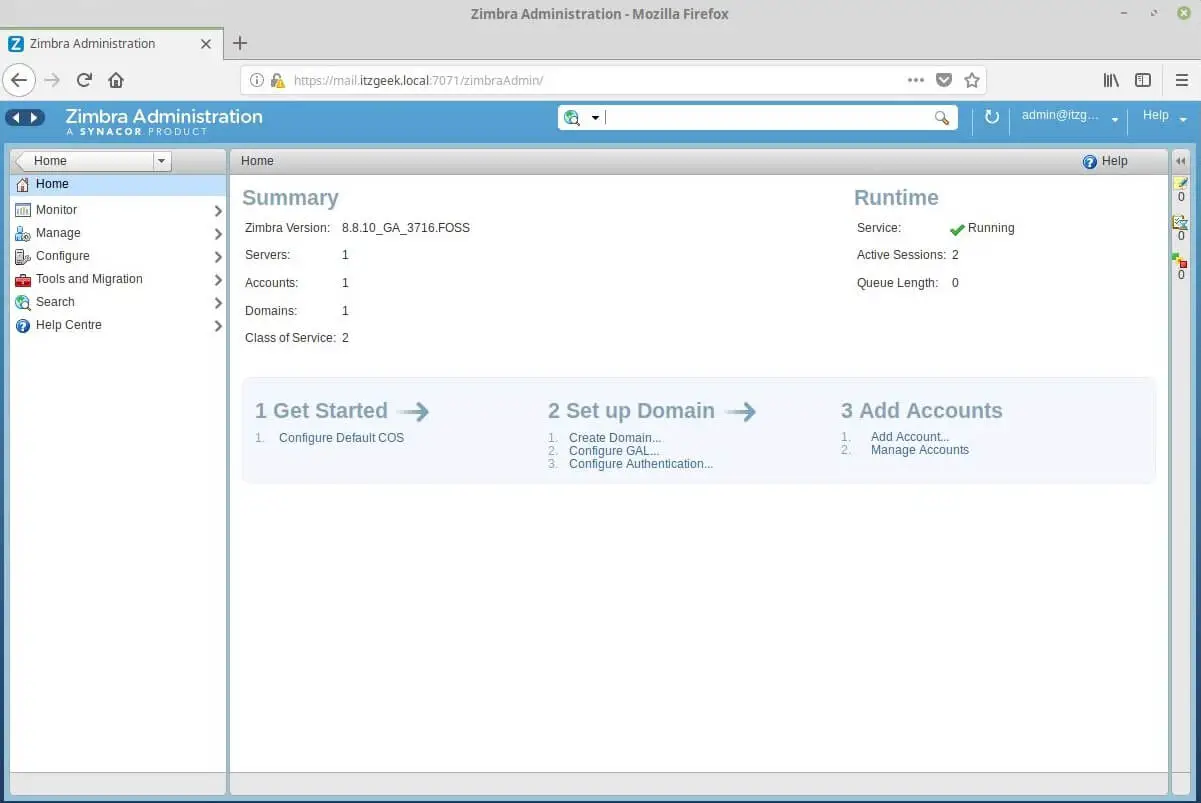
Access Zimbra Admin Portal
To access the Zimbra Admin Portal, type below URL in the Web Browser.
https://mail.itzgeek.local:7071/
You will get the Zimbra admin login page. Login with admin and the password you entered during the installation.
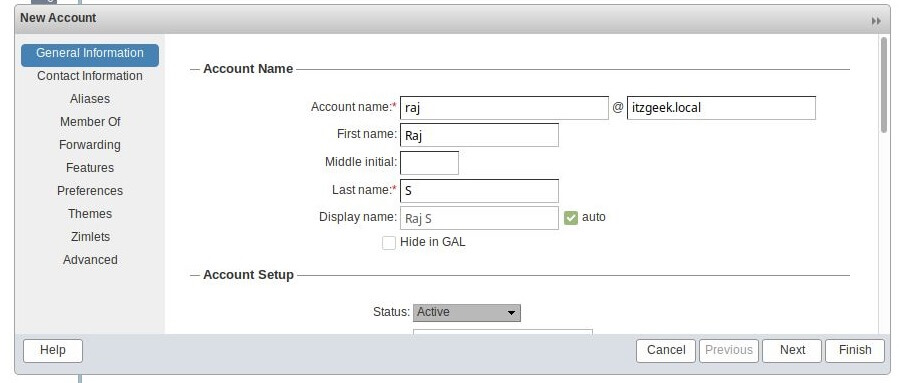
Create Email Account (Optional)
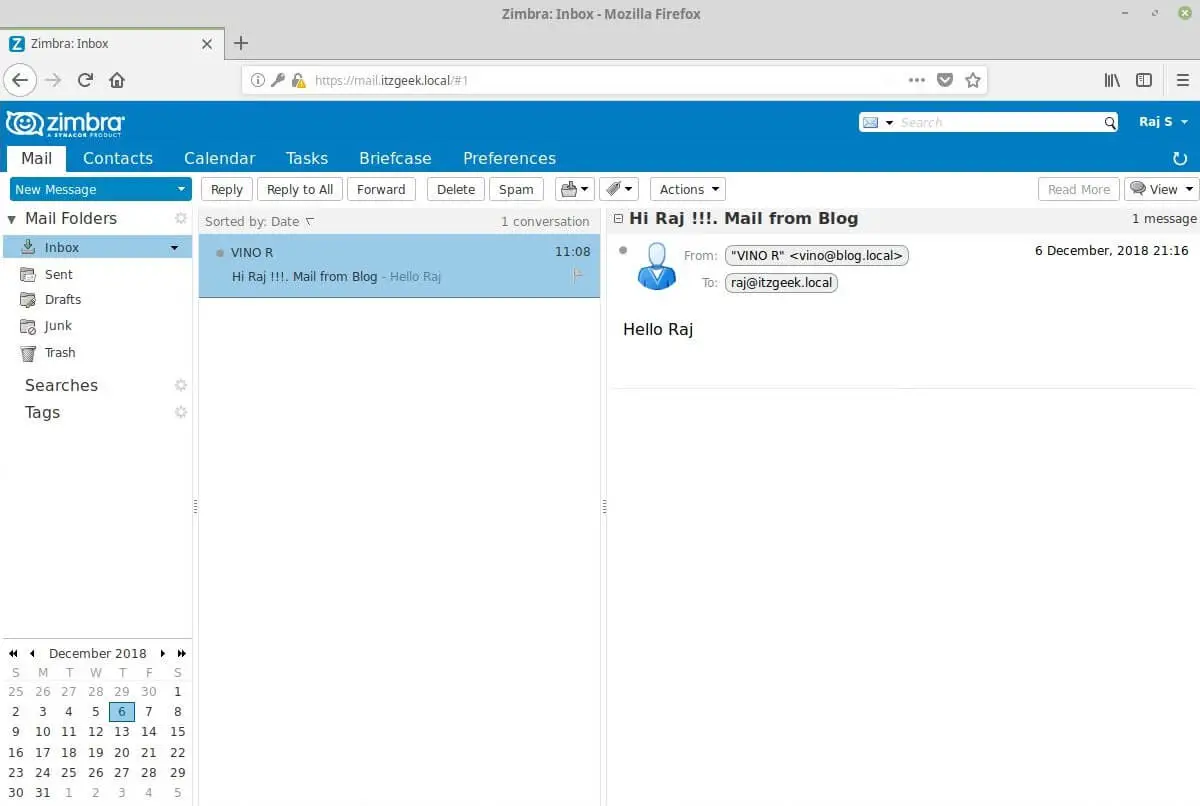
To test the functionality of Zimbra, I would be creating an email account for receiving an email from second test domainblog.local. To create an email account, go to Manage >> Accounts >> New.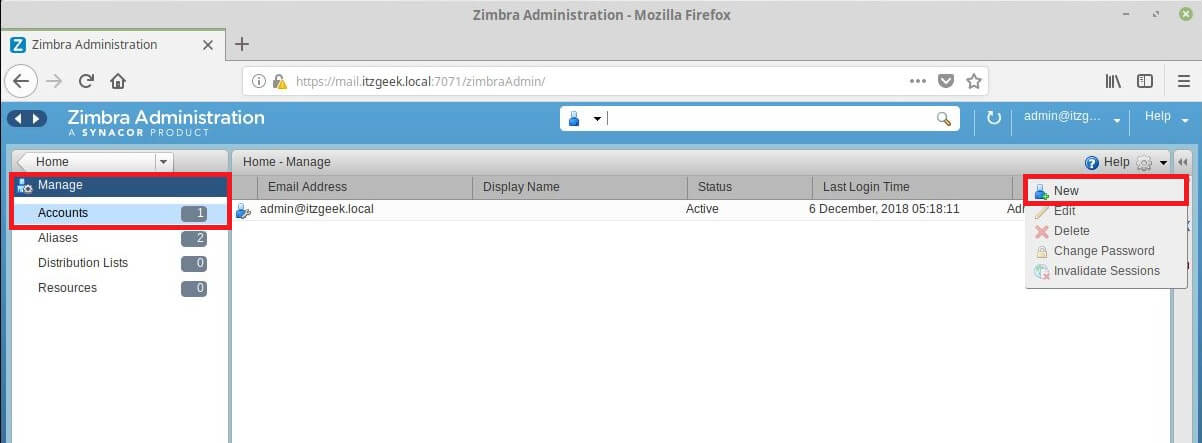

Access Zimbra Web Mail Client
To access Zimbra Mail Web Client, type the following URL in the browser
https://mail.itzgeek.local
Log in as the newly created user or as admin to see admin emails.Here, I will log in as
raj@itzgeek.local.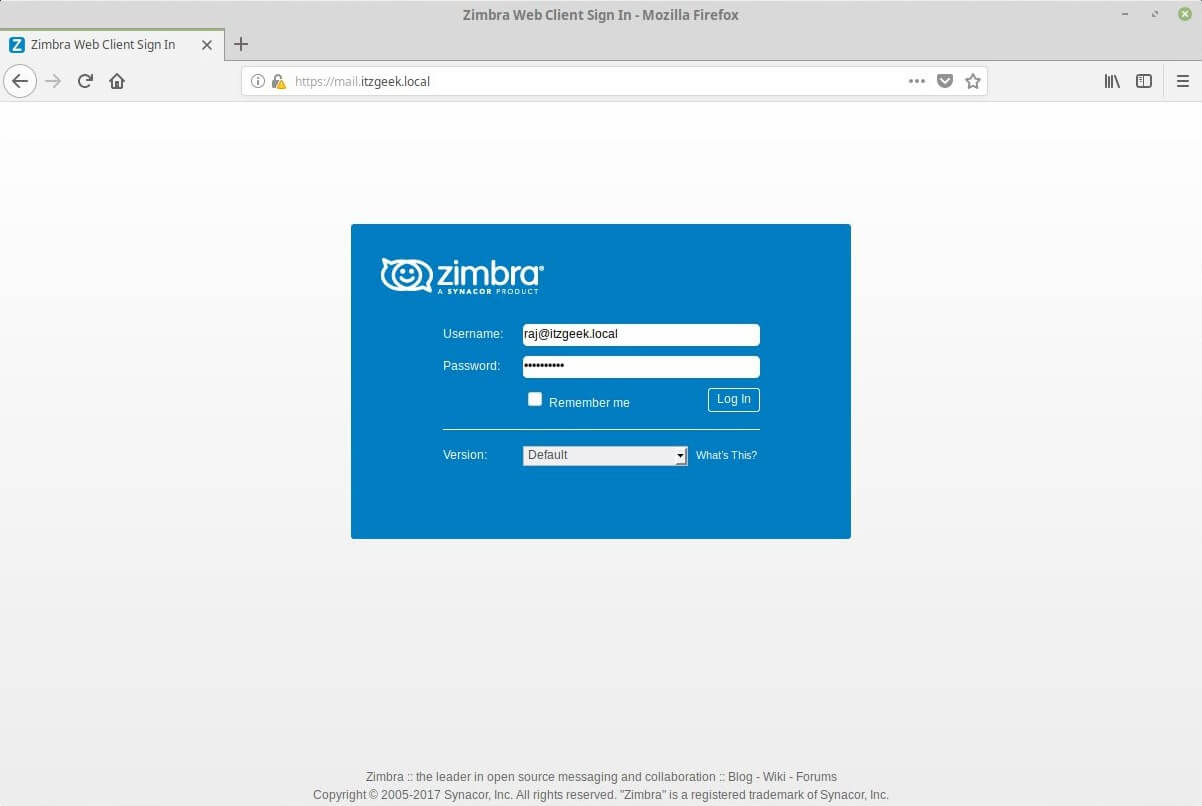
UnInstall Zimbra Collaboration 8.8 – Open Source Edition
In any time, you want to uninstall Zimbra mail server from the system. Go to the installer directory.cd /zimbra/zcs-8.8.10_GA_3039.RHEL7_64.20180928094617
Then, run the install.sh script followed by -u../install.sh -u
Source : https://www.itzgeek.com/how-tos/linux/centos-how-tos/how-to-install-open-source-zimbra-mail-server-8-8-on-centos-7-rhel-7-ubuntu-16-04.html